A group isn't really an obvious book promo tool in the same method that a Facebook ad is. A group lets you get to know individuals who share your interest. For authors, that should be something associated to your book or its category (for example, a group for people who read BWWM-- black women/white men-- romance novels).
While you are familiar with them, they are familiar with you, too. Possibly you share snippets of your writing, use suggestions associated to your competence, or help individuals make connections.
The point is: When you create a group, you create the foundation for a neighborhood built around a shared interest in something associated to your book.
That's a quick introduction of the "why." Exactly what about the "how?".

How To Open Group On Facebook
Before developing your group, I advise you a join a couple of Facebook groups related to your interests so you can see how they work. Observing a variety of groups for a while will help you determine what you wish to accomplish with yours, and perhaps even ways to do that.
When you're familiar with them, the process is pretty simple. I'll stroll you through the process utilizing screenshots I got when I created the Build Book Buzz Facebook group 2 years back. (To see a larger variation of any of the images below, just click on the image.).
Login to your Facebook account. On the ideal side of your newsfeed where you find your activity alternatives, choose "Produce Group" under "Groups.".

A window turns up that asks you for the group name. I desire you to understand this ahead of time so that you already understand exactly what you wish to call your group. This is necessary, best? You want to be thoughtful about the name. There's no need to agonize over it, but it should interact exactly what the group's about.

In that very same window, you have to choose your group's privacy-- open, closed, or trick. If you're not sure currently, read this article, "Exactly what are the personal privacy settings for groups?" The Build Book Buzz group is "closed," which implies that it can be found in a search, but exactly what takes place in the group remains in the group.
Remaining in that window, now you need to invite members. My reaction to this was, "What??? Currently? I haven't even seen my group on the screen yet!".
Yeah, regrettable. This is how they roll on The Facebook.
I invited simply one pal at this point just due to the fact that I needed to. I invited others later, after the group was established.
Click "Create" and you relocate to a screen that lets you choose an icon for your group. The icon shows up beside the group name in members' groups list on the left side of the timeline. I picked a book for the Build Book Buzz group. (That was a no-brainer.) You can likewise skip this step if you want.

Select "Okay" and like magic, your group appears in front of you!
Now you submit a cover photo. It works the very same method as it does for your profile-- just select "upload photo" and choose one that's waiting on your computer system.
Pointer: Now that you realize you have to do this, have your image pre-selected.

With the group cover image set the method you desire at the top, transfer to the ideal side of the screen to describe the group and add tags.
Discover the "Description" section on the right and choose "Add a Description.".
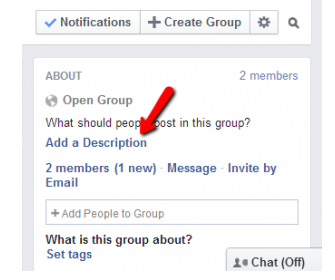
Your description needs to inform individuals what to get out of the group and why they will desire to be a member. What remains in it for them? Consist of any group guidelines, too.

Then add the "tags" using that alternative simply below your description. Tags are words related to the group subject that assist Facebook users discover your group in searches or through Facebook suggestions.

Next, you determine your group's Facebook web address-- the URL you will send out individuals to when you're sharing info about your group-- and the e-mail address connected to it, which, by the method, I have actually never used.
To do this, click the three dots next to the word "Notices" at the lower right of your cover image. Select "Edit Group Settings.".

On the next screen, beside "Web and Email Address" choose "Tailor Address." This will let you create a URL for your group with the main group name instead of a string of numbers.
Enter your group name (or whatever you desire in the web address). Select "Personalize Address" at the bottom.

While still in the settings, you can choose preferences for membership approval, posting authorization, and posting approval.
In my group, everybody can publish and what they share goes live immediately-- it does not wait on my approval. If someone posts something that's counter to the guidelines, I erase it. If they do it consistently, I remove them from the group. Select preferences that work for your group objectives. If one of them is conversation and engagement, then do not put any limits on that.
Your group is now all set to share with the world! Select "Conversation" in the upper left under your cover image to go back to your group's web page. Add individuals using the "Add Members" box on the upper right under the cover image or by sending them the connect to the group and inquiring to join it.
And one more thing please don’t forget to share this awesome trick to use the How To Open Group On Facebook with your friends.